What's Cooking?
A Black Bean Soup and Chili System
Black bean soup and black bean chili make a hearty and satisfying dish for fall and winter. If you use lean meat in the chili, and go slow with the salt, they are also reasonably healthy.
As you will learn with a little experience, black beans have enough flavor that the final result is not terribly sensitive to the detailed seasonings you may decide to throw in. So keep in mind that we are not baking a cake here, and so what follows are not recipes in the narrow, prescriptive sense. Think of them instead as guidelines for a way of cooking, for a philosophy of life, for a damn good bowl of black bean soup, or chili.
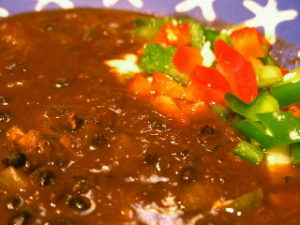
Christmas Chili 2004. (Photo by Jim Price)
Black Bean Soup
This recipe for black bean soup is my version of a more complex recipe that I found in a Caribbean cook book. The fully cooked black beans are also an essential ingredient for the black bean chili that follows.
Ingredients
- 1 lb dried black beans (also called rock beans or turtle beans).
- 2 medium onions, chopped,
- 1/4 cup olive oil,
- 2 to 4 cloves of garlic, diced and fried in the oil (mostly for the aroma while you do the rest, but be careful not to burn the garlic),
- 1 red and 1 green bell peppers (these add very little flavor but are good for color; perhaps best reserved for use as a garnish),
- 1 Tbl chili powder,
- 16 oz can of crushed tomatoes,
- 3 medium bay leaves, crushed,
- 1 to 3 tsp salt,
- other spices, to include oregano, basil, cumin (1-2 Tbl each),
- vinegar, 3+ Tbl near the end of the cooking,
- Worcester sauce and any kind of hot sauce.
Preparation
Carefully sort through the beans to remove the rocks and dirt that are very commonly found in black beans. I find that it works well to inspect a handful of beans placed one layer deep onto a white saucer. Rinse thoroughly. Boil for about three minutes, soak for an hour and then drain and rinse. This removes most of the sugars that cause gas and does not reduce the flavor appreciably. Cover the beans with a couple of inches of water and simmer over low heat in a large covered pan, stirring occasionally. Add the other ingredients with an hour or so left to go. Black beans do not produce much flavor until they make a rich, thick gravy. If the raw beans are old and dry, this may take four or more hours of steady cooking, so you will need to plan this feast well ahead.
To make an attractive serving for a larger group, place the cooked beans in a ceramic serving bowl and top with several kinds and colors of cheese. Melt (or even slightly brown) the cheese under the broiler. Add garnishes for color and flavor to include sour cream, diced green and red peppers and green onions, and any and every kind of chili sauce. This recipe makes enough soup for about ten generous servings. Black bean soup goes very well with rice, and is hearty enough to be a main course, especially if you throw in some left over pork or beef. But then you start to get into black bean chili.....
Black Bean Chili
This chili recipe is my own version of what is probably a very common meat chili (and it has an uncanny resemblance to the black bean soup). My friends tell me that this is the best chili they have ever had, but you'll have to decide for yourself. One important thing to note is that this recipe is best prepared a couple of days in advance of serving; as noted already the black beans require many hours of cooking, and the chili is much, much improved after it has aged for a day or two in the refrigerator.
Ingredients
- 2 lb of lean pork, or beef if you prefer. You can use an inexpensive cut of meat but promise me that you won't use ground meat!
- 1/4 cup olive oil,
- 4 cloves of garlic, chopped,
- 1 medium red and 1 medium green sweet bell pepper
- 2 medium sweet onions, chopped,
- 1 lb of dried black beans. This amount may, of course, be adjusted up or down depending upon the ratio of meat to vegetables that you like. These black beans must be cooked thoroughly in advance of their use here (see the black bean soup recipe above), and are an essential ingredient, far better than kidney beans. Canned black beans will work as a substitute, if you allow that they will probably need to be cooked some.
- 1-2 beef or vegetable boullion cubes (Knorr, the big ones),
- 16 oz can of crushed tomatoes, or 28 oz if you like, but be careful that the tomatoes are not too salty or acidic,
- 1 to 6 Tbl chili powder. This range gives a chili that is quite mild to somewhat hot; if in doubt try 2 or 3 Tbl and add the chili spices later. The idea is to develop a complex, hearty taste and not simply the world's hottest chili (which any idiot could do). See remarks on chili powder below.
- 1-2 Tbl cumin seeds, toasted lightly and ground,
- 1-2 Tbl coriander seeds, toasted and ground,
- 1-2 Tbl tamarind concentrate (can be sour, but adds an interesting, fruity background),
- 2 Tbl cocoa powder, mixed with warm water to a paste,
- 1 cup red wine,
- approx. 2 tsp salt.
- And other spices, of which more below.
Preparation
Dice the meat into roughly 1/4 inch pieces. You can remove all of the fat first. Thoroughly fry the meat in the olive oil. Frying should continue well past the point that all of the water has been driven off. Thorough browning seems to be the key to getting a full meaty flavor and making a good rich sauce. When the meat is nearly done, add the chili powder, continue frying for a few minutes, and then the garlic. Fry for another few minutes, but don't burn the garlic. On the side, saute thoroughly the chopped onions and bell peppers to bring out their best flavor. Add the vegetables to the pot along with about 4-6 cups of water, and all of the other ingredients, including the pre-cooked black beans. Simmer for an hour or more.
Other spices could include chilies of all sorts including bottled sauces; my favorites are: 1) Santa Fe Ole'; a red chili sauce made as a blend of three chilies (mild and flavorful, I use about 3 Tbl for this recipe) and 2) El Yucateco; a green habanero sauce that is pure dynamite and adds a completely new layer of spiciness (back of the tongue). I suggest to start with only about half a teaspoon of this remarkable stuff, as you can always add this at the table to suit individual tastes (I'd like more chili sauce, please).
Other useful additions can include basil, oregano, or Italian spices (dried, from a jar), Worcestershire sauce, etc. Some salt will probably be necessary, but be sure to taste the chili first, as the boullion and the canned tomateoes can be rather salty.
A note on chili powder: after a trip to Santa Fe our cubbard was filled with aromatic chilis and chili powders, red, green and smoked. It was irresistible to toss some into our last batch of chili, but I have to report that the result was a bit disappointing. The authentic,Chimayao red chili powder gave the chili a rather sharp, aromatic (chili?) flavor that I did not care for. Seems like the cheap (99 cents/bottle) brown chili powder from the local drug store, which is a blend of spices, gives a milder and more balanced aroma/flavor than did the 'real' red chili powder. This is a matter of taste alone, of course, and I am sure that a true Southwesterner (which I can only aspire to be) would find this an appalling comment.
Simmer over medium-low heat until the meat is tender, about an hour. Dried black beans take many hours to cook, and should be almost completely cooked before being adding to this recipe (otherwise you will end up boiling the meat to oblivion). This chili will keep for several weeks in a cold refrigerator, and it improves dramatically with age. There must be an upper limit to how much age, but I have never seen it go bad --- could this chili be immortal, or does it just get eaten?
To make a semi-veggie version of this chili, try using only 1/3 to 1/2 lb of meat but with the full amount of olive oil. Carrots (match stick cut), garbanzo beans, corn or anything with texture and color can be added with little or no loss of taste appeal. Just be careful not to overcook the veggies.
Garnish with diced bell peppers for color, cheese, sour cream, chopped onions, etc. and serve with warm tortillas and tortilla chips. If used as a main course, this recipe serves about ten lucky diners. Ice cold beer is a perfect accompaniment. But so are margaritas. Enjoy!
Chicken (Anything Goes) Vegetable Soup
Version 1.1, August, 2004
It's a common circumstance --- some leftover, roasted turkey, or maybe just a little rotisserie chicken has ended up in the back of the refrigerator. There are lots of good ways to use leftover turkey or chicken, and here's another one, chicken soup. This particular recipe is all about developing a rich flavor while retaining textures. There are just a couple of key steps to take note of, but so far as the ingredients are concerned, anything goes. I am not claiming that there is anything new in this, but neither did I find this in a book. Let me know if you have suggestions.

Ingredients
- 1 lb, very roughly, of leftover turkey or chicken meat, and, most importantly, the carcass, the stray parts (roasted), and all of the juices, brown bits, and at least some of the fat from the bottom of the roasting pan.
- 6-10 cups of bit-sized vegetables, which could include matchstick carrots, red or green peppers, green beans, 6-10 stalks of celery, two medium onions, canned corn, a yellow summer squash, mushrooms, etc., basically anything you can find in the back of the 'fridge or coming up in the garden. Tofu? Sure.
- 16 oz can of sliced tomatoes.
- White beans, 16+ oz can, which should be drained and rinsed, or up to 1/2 lb of dried beans, which must be precooked.
- 1-3 chicken or vegetable boullion cubes or equivalent (Knorr, or better is the chicken soup base from Minor's) depending upon the size and richness (fat content) of the carcass. This seems a little like cheating, doesn't it? But I'd suggest to do it anyway, in part you are not going to extract much flavor from the vegetables (more on that below).
- Spices to include, approx 3 Tbl dried Italian spices, 1 Tbl ground, toasted cumin, 1 Tbl ground, toasted coriander, 1-2 Tbl yellow curry powder, 1 Tbl paprika, 1 Tbl chili powder, etc. 1-2 tsp salt, if needed; same for black pepper.
- 3-6 Tbl olive oil, if the stock is w/o much chicken fat.
Preparation
Remove most of the meat from the carcass and set it aside. Put everything that remains of the carcass and pan drippings into an 8 qt covered soup pan and cover with (good, drinking) water; boil slowly. In effect you are making chicken stock, though without seasonings. You could add vegetables here --- onions, carrots, celery, etc. just be sure to fish them out. This stock is the essential ingredient for making a rich, flavorful soup. When you think it's boiled enough, about two hours, remove all of the solids and recover any useful meat.
Add all of the seasonings and the tomatoes noted above to the stock, and return to a slow boil for about ten minutes or so. Check for salt and additional pepper. Here's the first key point --- the flavor you are going to end up with in your soup is the flavor you'll have now. Adding the vegetables will not increase the flavor, and adding the reserved meat will actually decrease the flavor intensity!
Now add the vegetables in the reverse order that cooking time requires, say about 15 min for the carrots and celery, ten minutes for the green beans and so on. The second key point --- be careful not to overcook the vegetables --- you have already made a flavorful stock, so there is no need to extract flavor from the vegetables. Rather, the veggies add some interesting color and crunch. White beans, which are excellent in this soup, will thus require precooking of perhaps an hour. Shred the reserved meat (much more interesting than cubes) and add it to the soup with just enough time to heat thoroughly before serving; no more than about five minutes is required.
I like to have soup broth that is clear, or at any rate, not too cloudy or murky. A clear broth will tend to be very thin, however, so you may want to add a little thickener, a couple of teaspoons of arrowroot.
To serve, consider adding a small shot of vinegar for a little hot and sour character. Chopped scallions are nice as a garnish. Goes well with cornbread and beer.
This soup makes a great quick (leftover) meal and keeps in the refrigerator for at least a week. If you plan to keep most of the soup as a leftover, then you may want to cook the vegetables even less than described above; cook them just enough to sterilize and then finish cooking as you heat the soup prior to serving.
Vegetable Beef Variant
Version 1.0, November 2007
A beef version of this soup is also delicious. All of the remarks above regarding the vegetables applies here in full force. In place of leftover chicken, use
approx 2 lbs of beef marrow bones, and
approx 2 -3 lbs of stew meat, chopped to roughly 1/2 inch.
Brown the marrow bones in olive oil, and remove from the soup pot. Add the stew meat and brown thoroughly, well past the point that all of the water has been driven off. Thorough browning is a key here. Add about four to six cups of good water and bring to a simmer, along with the marrow bones. Before adding the veggies, remove the marrow bones, and extract the marrow. Discard the bones and return the (smashed up) marrow to the pot. Add the tomatoes, and veggies that may be cooked for a long period without concern for overcooking, e.g., onions, to the pot and simmer until the meat just begins to fall apart. Check the seasoning. Then add the remaining vegetables, being not to overcook.
Some additional seasoing is likely to be needed here just as it is with the chicken soup, and I especially like the low sodium beef soup base made by Minors; their vegetable base is also quite good. About two tablespoons of each seems about right (assuming a full six quart soup pot).
Thai Beef Salad
Version 1.0, August, 2004
Thai beef salad is a great summer dish --- light, quick and easy to fix on the grill, and always a crowd-pleaser. The essential idea is to combine a small but very good piece of grilled beef with an interesting green salad. The dressing for the salad can be anything you like, blue cheese, ranch, etc. are all approporiate, but a Thai-style hot and sour dressing is suggested here.
Ingredients
- A top quality beef steak, preferably ribeye; about 3 oz per person is usually sufficient. Marinate and season with black pepper.
- Salad greens, a good mix is half mesculin and half Romain lettuce
- 1/2 cup very thinly sliced sweet onion (assuming four servings here and below),
- 1/2 cup matchstick cut carrots, and any other vegetable that you would like to find in a green salad: mushrooms, tomatoes, sprouts, etc. are all good.
For the Thai salad dressing, blend together
- 2 small red and 2 small green hot peppers, finely diced. The kind of peppers is all-important; I recommend something less than habanero and much more than Italian. Cayenne, jalapeno or Thai peppers are about right.
- 3 Tbl grated fresh ginger
- 4 Tbl Thai fish sauce
- 6 Tbl lime juice, fresh if possible, but bottled whole juice can be good, too (Nellie and Joe's)
- 3 Tbl mild, rice vinegar
- 2 Tbl soy sauce
- 1 Tbl toasted sesame oil
- 1 tsp sugar (optional)

Preparation
Grill the steak over a very hot fire. My preference is to scorch the outside while leaving the inside fairly red. This imparts the maximum beef flavor. Let the steak rest for a few minutes, and slice as thinly as possible. Blend the salad greens and vegetables together, and add a modest amount of the dressing. Top with the thinly sliced beef. I suggest that you start slowly with the dressing and not add it directly on to the beef because this dressing does have a rather strong flavor; you can always serve the remainder on the side.
If you'd like a starch, then Basmati rice is appropriate. As a condiment for the rice, try a sauce made along the lines of the Thai salad dressing above, but with the proportion of fish sauce and soy reversed and w/o the fresh ginger or sugar. Very pretty, pungent and spicy! (I am sure this has a Thai name, which I do not know.) Unfortunately this sauce does not keep well and has to be made fresh.
Serve with a crisp white wine, e.g., a New Zealand Sauvignon Blanc, or cold beer. The lime in the dressing also goes very well with margaritas.
Grill-top Paella
Version 1.3: February, 2006
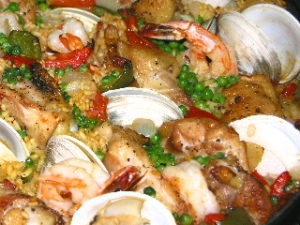
Grill-top Paella. (Photo by Jim Price)
Making a paella is a great way of entertaining friends who enjoy food and cooking. There is no denying that making a paella is a big production, but that's half the fun of it. There are lots of ways for guests to help and in the end a beautiful and flavorful meal that everyone seems to enjoy. The main thing I have to offer is encouragement --- making a paella is not as difficult or as risky as it might appear. In particular, the notion of cooking rice in an open pan over a fire seems doomed to failure unless you learned while growing up in the hills above Valencia. However, I have done it many times, knowing nothing more than I'll pass along right here, and have never had a serious failure.
The traditional cooking method is over an open, wood fire. Now that is tricky, but if you have the space and can count on decent, weather give it a try. Otherwise, I suggest that you cook your paella on a gas grill. The temperature is much easier to control and by adding some hardwood to the coals (cherry, hickory, etc.) you can build the smoky flavor of a wood fire.
The ingredients of a paella can be varied in many ways --- seafood or not, chicken or not, almost any vegetable would be fine --- but there are three key points that will help you toward a good result.
Paella comes from the Latin 'patella' which means pan. key point 1) is that you have to use a pan that is large enough that the paella will be no more than about 3 inches thick. The amounts listed below make eight generous servings and require a pan that is about 13 inches in diameter by about 3-4 inches in depth. I don't think that the thickness of the pan itself or the kind surface, i.e., whether ceramic or steel or teflon, matters very much and so almost any skillet that was of sufficient size would probably be fine. A lid is not essential, but some kind of handle is important. Check that your pan will fit on your grill.
Ingredients for eight servings
- 8 small pieces of chicken; medium thighs or drum sticks are fine; large breasts may be halved.
- 16 large shrimp, cleaned and and with the vein removed, leave the tails on; lobster is a great substitution.
- 16 small clams, e.g., cherrystones
- 1 medium red and 1 green sweet pepper
- 1 medium sweet onion
- 2 medium ripe tomatoes
- 12-16 oz of spicy sausage, e.g., chorizo
- 5 3/4 cups of flavorful chicken broth or stock (more on this below)
- 3 cups of medium grain rice, do not rinse
- 1 cup of sweet peas, frozen is fine, but bring them to room temperature
- 1/3 cup of olive oil
- 1/2 tsp of saffron threads, lightly packed into the measuring spoon
- other spices to include salt, black pepper, bay leaf, etc.
Preparation
Dice the sausage into roughly quarter inch pieces and fry thoroughly in a large skillet. After the sausage has started to turn crisp, remove from the skillet. Saute the shrimp for about two minutes in the sausage oil to pick up color and spices; remove well before they are cooked through, as they will cook mainly in the broth. Season the chicken with salt and black pepper, and fry in the olive oil until golden brown, about 15 minutes as it too will cook in the broth. Set the chicken aside and save the remaining oil. In the same skillet, saute the onion and peppers until they start to wilt, just a few minutes, and remove. Save the oil.
The chicken broth is the essential element of the paella flavor. Best would be a homemade chicken stock, but I have found that Minor's chicken soup base is excellent, and certainly far better than any canned chicken broth that I have tried (Minor's can be found by a web search for soupbase.com). Heat the chicken broth to boiling in a sauce pan, and add all of the spices including the saffron. key point 2) is to taste the broth after it has simmered for about ten minutes, and say 'hello' to your paella. The broth is that important, even with all of the wonderful seafood, sausage and chicken you are going to add later. You are looking for a flavorful broth, though without being excessively salty, so carefully adjust the flavor by adding chicken bouillon cubes, or pepper, or herbs or additional saffron or whatever it takes. Just how you should spice the broth will depend entirely upon the broth that you began with, and so I can only advise that you use your good judgment. The steps to here can be done several hours in advance.
There should be about 1/8 cup of oil remaining in the skillet used to saute the vegetables; heat it up, and pour the rice into the warm skillet. Turn the rice over medium heat for about 4 minutes. This will lightly coat each grain with the warm oil and pick up the flavor from the chicken and vegetables.
Start the gas grill a good 20 minutes early, and adjust for a fairly warm fire, about what you might use for fish, say, but not roaring hot as you might use for beef. Warm the paella pan, and add 5 3/4 cups of boiling broth (be careful!) followed by the rice, the vegetables and the sausage. Blend this together. You may find it easier to do this step inside over a stove. After a few minutes you can add the chicken pieces on edge as you will need all the possible the open space for other things (see the photo above). By this time the rice/broth mixture should be bubbling gently around the edges of the pan. Cook with a closed grill lid to trap the wood smoke and heat. If your fire is uneven, and it probably is, rotate or move the pan fairly often to avoid drastically uneven cooking. Do not stir the rice after the first few minutes.
After about ten minutes push the clams into the rice, again edgewise, with the open end up. After another ten minutes have elapsed, poke the shrimp into the rice. After about another ten minutes -- 30 minutes total -- the paella should be nearly done; the liquid will be mostly absorbed, and the clams will have opened up (see the photo above). key point 3) is that by cooking the clams for 20 minutes and the shrimp for no more than 10 minutes, you can be sure they are safely cooked without being overcooked, which harms both. The tricky part of paella would seem to be to have the rice, the clams and the shrimp cooked just right at the same time. But as I noted earlier, I have never had a serious problem with this, so it must be the case that medium grain rice is rather forgiving. The perfect paella will have a crust of browned rice stuck to the bottom of the pan; aficionados consider this the prize.
Take the paella off of the fire (the handles will be amazingly hot) and cover it with a lid or tin foil. Let it rest for another ten minutes to complete cooking the rice A surprising amount of the remaining broth will be adsorbed during this resting period. Make sure that all of your guests have a chance to appreciate their beautiful creation before they take it apart.
Serve with green onions, lime, lemon and garlic toast. Paella goes well with red wine, white wine and beer (i.e., I am recommending all three). If you really aim for a Spanish flair, sangria is also a great accompaniment. So are margaritas. Enjoy!
Thanks to Whit Anderson for helpful suggestions.
Steak au Poivre
Version 1.1, January, 2005
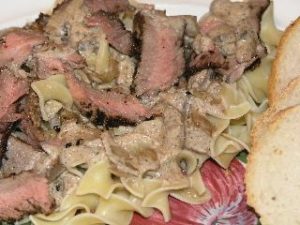
Steak au Poivre. (Photo by Jim Price)
We love beef Stroganoff and steak au poivre, and so have created a dish that combines features of both. And yes, it does look a lot like Thai beef salad. If you enjoy beef and are not intimidated by cholesterol, you may love this dish. We show it served over egg noodles and were thinking of calling it Stroganoff au poivre, but it is closest to being a variant of steak au poivre. Crispy fried potatoes are excellent in place of noodles.
Ingredients for two servings
- A very high quality beef steak, ribeye or filet; about 3 oz per person is usually sufficient.
- 3/4 cup light cream
- 1 Tbl of cognac; Madeira or whiskey could be substituted
- 1 cup chopped mushrooms
- 1/2 cup chopped sweet onion
- 2 Tbl olive oil and butter
- beef boullion concentrate, enough for one cup of full-flavored beef broth
- coarse-ground black pepper, salt.
Preparation
Season the steak with lots of fresh ground black pepper and a little salt. Add the oil and butter to a skillet and heat until almost smoking then add the steak. Cook over fairly high heat, about 3-4 minutes per side. When you think the steak might be done, remove to a warm oven for holding. There should be appreciable oil left in the skillet. Add the onion and then the mushrooms and saute for about 4 minutes. Dissolve the beef boullion in a few Tbl of water, and add to the skillet along with the cream. Cook while stirring over medium heat until the sauce begins to thicken, then add the cognac. Check for salt. You may also want to add 1-2 tsp of Maggi or similar seasoning,
To serve, you can either slice the steak and put it on top of the noodles with a little sauce, or leave the steak whole. This goes well with a lighter red wine, Pinot Noir or Beaujolais Nouveau. Enjoy!
Tortilla Soup
Version 1.1, April, 2006
Tortilla soup comes in many varieties. The recipe below is one that I have developed after a bit of trail and error, and might be described as a spicy chicken soup with a Southwestern twist.
The amounts shown below yield six modest servings that would be about right as the soup course to a big dinner. If served as the main course, which this soup is certainly hearty enough to be, this recipe makes enough for three or four.
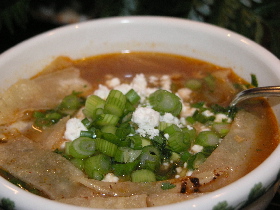
Tortilla Soup. (Photo by Jim Price)
The ingredients
- 8 oz of raw chicken, say tenderloins. Note, though, that this is a great place to use leftover, cooked chicken of almost any sort; charcoal grilled chicken adds a very nice smoky flavor.
- 3 Tbl olive oil and butter
- 8 small corn tortillas
- 1/2 medium sweet onion, diced small
- 2 cloves garlic, diced fine
- 6 cups of fairly strongly flavored (but not salty) chicken broth or stock
- 6 oz of chopped tomato; canned is fine, but I don't recommend crushed or pureed
- 2 tsp chili powder
- 1/2 tsp hot paprika
- 1/4 tsp ground cumin
- 2 Tbl lime juice
- 1 Tbl vinegar
For the garnish
- 1 medium ripe avocado, diced into roughly 1/3 inch chunks
- 1/2 cup chopped cilantro
- 1/2 bunch of green onions, chopped
- 1/2 cup crumbled goat cheese
Preparation
Slice the (raw) chicken into 1/2 inch slabs and fry in a hot skillet with the olive oil and butter. Remove the chicken when fully cooked and slightly browned. You can slice or shred the chicken when it cools. In the same oil fry the tortillas for a couple of minutes or until they brown lightly. Remove the tortillas to a paper towel to cool. This frying will help the tortillas hold some texture in the hot soup. In the remaining oil, sauté the garlic and the onions.
Simmer the chicken stock, tomatoes, sauted onion and garlic and the other spices (less the lime and vinegar) noted above for about ten minutes in a sauce pan. Adjust the flavor with additional pepper sauce, cumin, etc., to get the spicy flavor you want. The spices indicated above are likely to be on the light side for most. I aim for a deep, mellow, spicy (but not extremely hot or tomatoey or salty) flavor for my tortilla soup and so will reach for a little additional pepper at this stage, say 1 tsp of Tabasco sauce. Many good recipes recommend fresh chili peppers, and if you have them then use them, of course. However, as you probably know from experience, it is nearly impossible to gauge the flavor intensity of a fresh pepper without actually tasting it (even when you have raised it lovingly from a seedling) and so I tend to favor bottled sauces or powders for most cooking. Note that a tangy, slightly sour taste is coming later with the lime juice and vinegar, which will be added just before serving. These steps can be done hours before serving, but take care that the chicken is covered and refrigerated.
To prepare for serving, add the lime juice, vinegar and the cooked and shredded chicken to the gently simmering broth. I love lime, but have suggested a rather small amount here. Make one last check of the seasoning to see if this suits your taste.
Slice the tortillas into strips, and place a small handful of the strips into a generous soup bowl. Ladle in about one cup of the hot soup and then add about 1 heaping Tbl of chopped cilantro, avocado and then the crumbled goat cheese and a generous dash of chopped green onions. Sprinkle a few more tortilla strips along the sides, add a small squeeze of fresh lime if so inclined, and you have a delicious and attractive tortilla soup.
The goat cheese adds a nice, tangy flavor and will melt, where other cheese may become a gummy mess. Thus the soup will lighten in color and thicken somewhat as you eat it. If you don't care for this, then swap out the goat cheese. The soup broth is then likely to be rather thin; try about 1 or 2 tsp of arrow root to thicken the broth slightly.
Veggie version: There is nothing essential about chicken in this recipe, and a great veggie version will come from using vegetable stock in place of chicken stock, and any kind of crunchy vegetable --- corn, chickpeas, red and green bell peppers, snowpeas --- in place of the chicken meat. Hmmmmm..... these would be good in the chicken version as well.
This soup goes very well with cold beer and with margaritas. If you like avocado even half as much as we do, then guacamole and tortilla chips will make a great accompaniment

 Lobster Bisque
Version 2.1, October, 2018
Nothing evokes the flavor and aroma of the sea quite like lobster bisque. The key ingredient --- lively, fresh lobster (see above) --- has a somewhat subtle flavor, and so the goal of this recipe is to suck every last bit of flavor from the poor beasts. That makes for a fairly lengthy and messy project: start to finish requires about four hours and roughly two hours of active work, most of which should be done well before the company arrives.
What you will need
- Two 1 lb lobsters will make a soup course serving for eight adults. With salad and good bread this would make a main course for four.
- A cup each of chopped carrots, sweet onion, and celery.
- A small, 6 oz can of tomato paste.
- 3 - 4 cups of light cream, and ¼ cup butter.
- One cup dry white wine, and ¼ cup Madeira or brandy.
- Spices are minimal, but could include Italian dried seasoning blend, Old Bay, saffron, and black pepper.
- Two large soup pots. An immersion blender is very helpful.
Preparation
The lobster: Bring to rapid boil about 10 cups of very lightly salted water (a teaspoon of salt is plenty). Dunk the lobsters head first, and boil for about 12-14 minutes. Reserve the cooking water. Let the lobsters cool. Working over a bowl to catch the lobster juices, begin the gruesome task of dismembering the cooled lobsters; remove and set aside the claw and tail meat, and clean out the vein. Leave on the mushy white stuff that often clings to the meat. Break the shells and legs into roughly one inch pieces and remove all of the meat you can find. Rip open the bodies and remove and set aside the tomalley (the green stuff) which should be somewhat firm, if the lobster has been cooked sufficiently. Remove and discard the gills from the lower body shell, and extract the meat from the lower shell. Keep the exterior (red) shell bits and legs, except for the head, which should be discarded. Cover the meat and refrigerate. The worst is over.
Making a lobster stock: This is the key step. Sauté the broken shell in a soup pan over low-medium heat in 3 Tbl of olive oil for about 15 min. Then add 8 cups of the reserved cooking water to the pot (I suggest that you sample the cooking water first, to make sure that you like the taste.) Also add one cup of dry white wine to give about 8 - 9 cups total liquid at the start. Simmer for about an hour over low heat. You can also add additional seasoning, say 1 Tbl Italian dried seasoning, 1-2 tsp of Old Bay, 2 bay leaves, and some black pepper, but I suggest no salt just yet. When you think this has gone on long enough or the company is about to arrive, strain the stock through a fine sieve and into another soup pot. At this point the stock will have a mild taste, probably not as super-lobstery as you might have hoped……. keep going.
Making a bisque: In a skillet, sauté until soft 1 cup each of chopped onion, carrot and celery. Add this to the simmering, strained stock along with about 3 oz of tomato paste, the reserved lobster dismemberment juices and the tomalley. Work the stock over well with a power immersion blender (or food processor) to yield the texture you desire. Most of the texture will come from the blended vegetables. If you would prefer your bisque to be almost completely smooth, then add the chopped vegetables to the stock while simmering the shell, so that it will be removed when strain the stock.
Now add 3 cups of light cream while wisking. Let this warm for a few minutes but avoid heavy boiling as this could burn easily. Give the bisque a taste and decide whether you need more cream, tomato paste or perhaps some additional pepper, Old Bay, or at this last step, a little bit of salt. I’d suggest that you be conservative with spices, as the best is coming. If you’d prefer the color to be a little more red or orange, add some saffron or turmeric. If the bisque is too thin even after the cream has simmered for a bit, add some arrowroot. The steps to here can be completed several hours before serving.
Finishing and Serving
In a skillet, melt about 3+ Tbl of butter over low heat and add the chopped or shredded lobster meat along with about 3 Tbl+ of brandy or Madeira (I like medium-dry Madeira for almost all cooking that calls for cognac or brandy). Sauté for a few minutes to warm the meat and let it absorb some of the butter and Madeira.
Ladle the warm bisque into a shallow soup bowl, and top with a nice portion of the sautéed lobster meat. Drizzle on any remaining butter/Madeira from the sauté pan (you may want to make a little more of this wonderful sauce). Garnish could include chopped green onions, black pepper, paprika, or if you are lucky enough to have it, cooked lobster roe.
Lobster bisque goes well with a full-flavored, dry white wine.
Acknowledgments: I first noticed the shell- sautéing step in a recipe by Bobby Flay. Thanks to Mike and Eileen Spall for helpful suggestions. I hope that you will enjoy your bisque, and will let me know if you have any suggestions.